Author

anshu

Browsing

AlmondBiscotti_Featured2
I remember first time I baked them I was in Mexico and we were making a trip to the State of Michoacan to the Butterfly Sanctuary to witness a spectacular Event. There are millions of Monarch Butterflies. You can see them flying around and almost obscuring the sky. You will hear the fascinating sound of their wings flapping. Its indeed the 8th wonder on Earth. Every fall, huge numbers of Monarch Butterflies gather in southern Canada to migrate. Some Monarch Butterflies travel over 3,100 kilometers to Mexico to reproduce and and then die.

Michocan_1
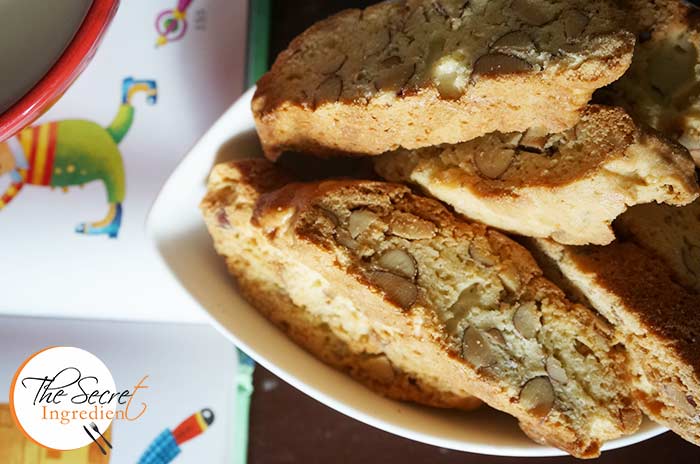
The trip was a beautiful comfortable journey. These cookies kept our spirits high and energy boosted. Whenever I bake these I remember this memorable trip. Coming back to cookies, they are crunchy and so very almondy. The roasted almonds gives it an incredible texture and taste. You can dunk them in your coffee or chai and take a short trip to heaven. 🙂

AlmondBiscotti_Featured1
Directions:

1. Preheat the oven for 10 minutes on 180 degree Celsius (Learn more about Oven temperatures and Conversion). In a baking tray spread the almonds in a single layer and toast them for 10 minutes. They will give out a golden colour and will crunch up.

DSC02886
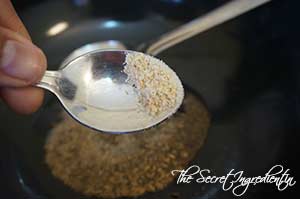
2. Let them cool down a bit and roughly chop them using a sharp knife.

DSC02888
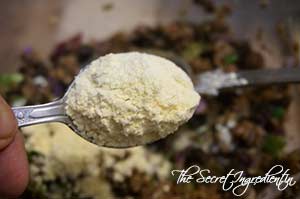
3. In a bowl combine All purpose flour, salt and baking powder. Set aside.


DSC02890


DSC02892


4. In a different bowl whisk Sugar and butter (Learn how to bring eggs and butter at room temperature) until it turns creamy.


DSC02880


DSC02881


DSC02882


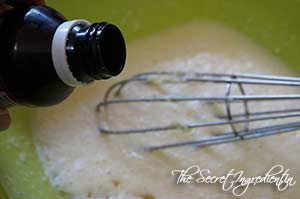
5. Add in eggs and Vanilla Extract. Continue to whisk until its very creamy. Also add Almond Extract.


DSC02885


DSC02883


DSC02889


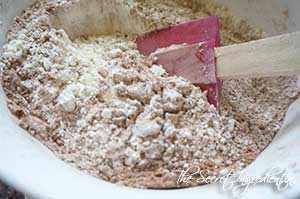
6. Add in the flour and mix thoroughly. It should resemble a sticky dough. Do not over mix, just till the flour is moistened.

DSC02893
7. Add in chopped toasted almonds and simply fold in using a spatula.


DSC02894


DSC02895


8. Sprinkle some flour on the counter slab and put the sticky dough on it.

DSC02896
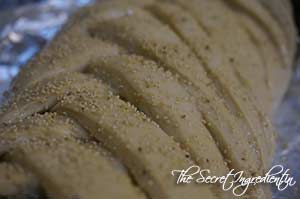
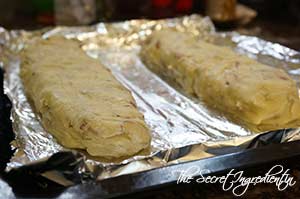
9. Divide and shape the dough into four logs about 6 inches Long and 2 inches wide. Flatten the logs with your finger tips. You will need a lot of extra flour to do this. Place them on a baking sheet lined with aluminium foil or parchment paper. Ensure there is 4 inch space between each logs as they will expand on baking. I baked two logs at a time. 

DSC02897

10. Bake it in a peheated oven for 35-40 minutes on 190 degree C until they acquire a slight golden colour.

DSC02899
11. Let them cool down a bit, cool enough to handle. Place it on a chopping board. Slice it diagonally using a serrated knife and further cut them into 3/4 inch pieces.

DSC02900
12. Arrange these pieces on a lined baking sheet and return them to the oven. Bake them for 7 minutes on one side and then flip the side. Bake the other side also for 7 minutes.

DSC02902
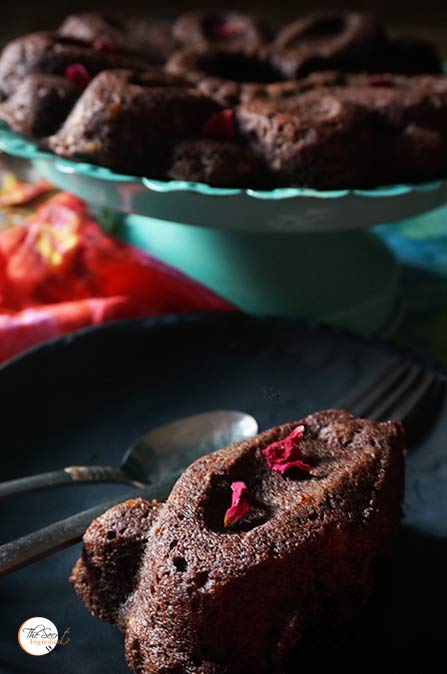
13. Let them cool down for 5 minutes on the baking tray and then transfer them to a wire rack to cool down completely. The cookies will crisp up only after coming at room temperature. Dunk them in your coffee and enjoy these delicious twice baked Italian Biscotti.

Other Cookies you can try here : White Chocolate Chip Cookies, Peanut Butter Chocolate Chip Cookies, Coconut Chocolate Cookies

AlmondBiscotti_Featured4[whohit]Almond Biscotti[/whohit]

[yumprint-recipe id=’166′]


AlmondBiscotti_Pinitrest1

AjwainiArbi_Featured2
This Ajwaini Arbi is my mother’s recipe and I love it! In Mexico I missed eating Colocasia or Arvi or Abri as it is called. So when I came back I ensured I made this every week in the season. The usual way of making is to simply fry it with some basic spices but then this way of cooking it with carom seeds makes it special and oh so delicious. 

AjwainiArbi_Featured3
A lot of people get rashes or itchiness when they peel colocassia. Undeniably I am one of those. I have tried putting mustard oil before peeling the skin, but that also doesn’t seem to work. So last resort is I have bought latex gloves and wear them. That seems to have worked wonders. Now I can cook my favourite vegetable without scratching like a puppy 😛

In Almora we get plenty of Arbi and also its leaves. This gives me opportunity to try out various versions of this humble root vegetable.I made Arbi Curry Masala specially for Navratri Fasting, as it is without Onion Garlic. I also made Arbi Ke Patton Ke Pattode, which is Colocasia leaves rolled fritters. You must try these they are amazingly lip smacking.

Directions:
1. Wash Arbi and remove all the grit. 

DSC01262
2. Put the Arbi in Pressure pan with some water and  cook for 3 whistles or 5-7 minutes. Make sure the arbi doesn’t get overcooked and retains its shape. It will taste awful if becomes frail.


DSC01263


DSC01264


3. After boiling arbi drain it in a colander and let it cool down to room temperature.

DSC01265
4. Peel the skin off using a knife. The skin will be easy to remove once its boiled.

DSC01266


5. If the pieces are big in size cut them into halves.

DSC01267
6. In a wok heat some ghee or clarified butter. You can use other cooking oil as well. 

DSC01268
7. Add carom seeds or ajwain, cumin seeds and Amchur.


DSC01269


DSC01270


DSC01271


8. Once the seeds begin to crackle add the arbi and toss with the seeds. 

DSC01273 
9. Add salt, red chilli powder and coriander powder and a little turmeric powder.


DSC01274


DSC01275


DSC01276


10. Mix everything together and cover with a plate or lid barely fitting the vegetables. Press down under and let it cook for 5-8 minutes, Then toss again and keep cooking till the arbi is crisp. Keep an eye don’t burn it 🙂

DSC01277
11. Sprinkle with Garam Masala and Chopped Fresh Coriander Leaves. Serve hot with Roti or Tawa Naan.

Other Colocasia or Arbi recipes you can try : Arbi Curry Masala, Arbi Ke Patton Ke Pattode.
You can also try other every day dishes: Aloo Methi, Tori Wadi, Dahi Wala Karela, Methi Matar Malai.

AjwainiArbi_Featured1[whohit]Ajwaini Arbi[/whohit]

[yumprint-recipe id=’165′]


I always thought I can handle spices and chillies very well. I also thought Punjabis make the most fiery curries and other recipes. But this chettinad Pepper Chicken won hands down and proved me wrong. I was surprised how amazingly hot can be those red dried chillies be if you put one extra than called for in the recipe. Nevertheless it was an awesome recipe. You can limit the chilies as per your taste buds.


The way the Curry leaves, mustard and other spices marry with the chicken creates an unforgettable harmony of flavours. This is a welcome change to your regular way of making chicken. I am sure this will leave a lasting impact on your mind and on your tongue 😛

Directions:
1. Take boneless chicken and cut it into cubes or bite size pieces.

DSC01542
2. For the dry spice mix add cumin seeds, whole coriander seeds and green cardamoms in a small pan for toasting.


DSC02423


DSC01528


DSC01529


3. Also add whole pepper corns, Cinnamon Stick and dry Red Chillies. You can remove the seeds from the red chilies to make it less fiery.


DSC01530


DSC01531


DSC01532


4. Toss these spices on a medium low flame until they become fragrant and on cooling down ground them in a coffee grinder or spice grinder. Set aside.


DSC01533


DSC01534 


5. In a wok or kadhai add ghee. Add mustard seeds and let them crackle for 10 seconds or so. You could even add fennel seeds, I did not add as I am allergic to it.


DSC01535


DSC01536


6. Once the seeds begin to sputter add the dry spice mix. Saute everything on low flame for a couple of seconds.

DSC01537
7. Add Sliced onions, Ginger Garlic paste* and Kaddhi Patta. Saute the onions till they become soft.


DSC01538


DSC01539


DSC01540


8. Add chopped onions and continue to cook them till they become soft and gooey.

DSC01541
9. Add chicken pieces to the wok and combine together.

DSC01543
10. Add turmeric powder and season with salt.


DSC01544


DSC01545


11. Mix together and let it saute for a minute or so.

DSC01546
12. Add water, bring it to a boil and put the lid on, simmer on low flame till the chicken is well cooked. It should take 15 minutes or so. 


DSC01547


DSC01548


13. Dont forget to open the lid in between and stir and see if anything is sticking to bottom. The spice should have coated well with the chicken.

DSC01550
14. Serve hot as an appetizer or even as a main course with a roti or tawa naan.

You can try other Chicken Recipes here: Butter Chicken, Grilled Chicken Salad. Mexican Chicken Soup with Rice.

 [whohit]ChettinadPepperChicken[/whohit]

[yumprint-recipe id=’164′]

Braided Bread
Ever since I have perfected the art of baking a simple sandwich bread I like to experiment with my bread dough. I love to braid it, stuff it and do all sorts of crazy things with it. It is not just fun but the experience is both pleasing and delicious . I had been eyeing this braided bread – Stromboli for a long time but the last time I had mushroom and spinach on hand I simply went ahead and baked this beauty.


As I said you can do anything with your bread so you can choose any stuffing of your choice. You can braid it or shape it like a Bread Loaf with inside layering, just as I did it with Cinnamon Raisins Bread. Its your Bread you are the master. Simply give it a pinch of love and loads of patience and you will have a beautiful bread making experience.


For this recipe I have used the bread dough for White Sandwich Bread. Its extremely light and has a beautiful texture. If you like you can substitute Half all purpose flour with whole wheat flour to make it more healthy.

Directions:

1. For the dough,  take some lukewarm water in a vessel. It should neither be hot nor cold, just hot enough to comfortably put your finger into it . The right temperature of the water is very important for yeast to activate. Put yeast into it.

DSC02540
2. Along with yeast add some sugar.

DSC02541
3. Give it a gentle stir with a fork and let the mixture sit and activate for 10 minutes or until you see some bubbles on top and mixture has become frothy and milky.

DSC02548

4. Take all purpose flour in a bowl and add salt and olive oil.


DSC02549


DSC02551


5. Add the proofed yeast to the flour little by little and mix till it comes together.

DSC02553
6. Bring the dough to a flat counter or your kitchen platform and knead for good 10 minutes till it becomes soft and supple. Read more about Bread baking techniques in “Basic Steps to Bake a Perfect Bread

DSC02554
7. Transfer the dough to a greased bowl. And cover with a kitchen towel or cling wrap. Let it sit for an hour or so to double up in size.


DSC02560


DSC02562


8. Punch it down and deflate the dough. Knead for another 5-7 minutes.

DSC02563

9. Chop some spring onions along with their greens and Garlic and set aside.

DSC00783
10. In a pan heat some butter and olive oil.


DSC00785


DSC00786


11. Add garlic and onions and saute them till they are soft and translucent.


DSC00787


DSC00789


12. Add Red chili Flakes and saute.

DSC00788
13. Add sliced Mushrooms and chopped spinach. Saute the mushrooms till it releases its water and cooks.


DSC00790


DSC00791


14. Season it will salt, freshly ground black pepper and dried oregano.


DSC00792


DSC00793


DSC00794


15. Add whisked cream cheese to the mushroom spinach mixture and combine. Turn the flame off and let the mixture come on room temperature.


DSC00795


DSC00796


16. Divide the dough into two equal parts. Work on each dough one by one.

DSC00797
17. Roll the dough with a roller pin into a rectangular circle. Place the rolled dough in a baking tray lined with aluminium paper or parchment paper. I did it after braiding and it was difficult to transfer at that stage. Don’t commit the mistake I did 🙂

DSC00798
18. Place half of the mushroom cheese filling in the centre. Leave out place to braid the bread. Take a sharp knife and make inclined cuts about 1 inch wide on either sides of the filling. Ensure there are equal number of cuts on both sides.


DSC00799


DSC00800


19. In order to braid the bread, take one strip and cross it over the filling and press it on the other side. Alternatively take the adjacent  strip and cross it over the previous one and press on the other side.  Keep doing this until your full bread is braided. Cover the bread with a lint free towel and let it rest for 20 minutes or so on room temperature. It will rise the bread.


DSC00801


DSC00803


20. Brush the braided bread with Egg wash or Milk. Sprinkle the top with poppy seeds or sesame seeds or you can completely leave it out.


DSC00805


DSC00806


21. Bake it in a preheated oven on 180 degree Celcius for 25 minutes or until the crust is golden. Let the bread cool down completely on a wire rack and then slice and serve. 

Other Bread recipe you can try on The Secret Ingredient: White Sandwich BreadRussian BubliciWhole Wheat Sandwich BreadChinese Black Sesame Steamed BunsCherry Focaccia Bread with Rosemary and Sea SaltRosemary Garlic Focaccia Bread, Cinnamon Raisin BreadBeetroot Bread with Garlic and ThymeHoney Oats BreadDomino’s Garlic Breadsticks, No Knead Light Wheat Bread.

[yumprint-recipe id=’163′]Sending this Bread to YeastSpotting

VegShammiKebab_Featured3
Shami Kababs also known as Shaami Kebabs are predominantly part of Punjabi Cuisine but nonetheless it is a popular snack in Kashmiri, Bangladeshi and Uttar Pradesh Culture. Traditionally it is made with some kind of meat and black bengal gram or channa dal along with spices. But this version is completely vegetarian made with Black Bengal Gram or Kaala channa. This snack is an ideal snack for evening tea.

VegShammiKebab_Featured4
The goodness of kabuli channa mixed with spices and crispy texture makes it very inviting. You can even air fry them for a guilt free snacking. I make this often from leftover boiled channas. With rest of them you can try the delicious Dry Spiced Kale Channey

Directions:
1. Soak Kaala Chana or Bengal Gram overnight and boil them in a pressure pan with water for an hour or so till they become soft. Place them in a bowl.

DSC02262
2. Mash them coarsely with a potato masher.

DSC02263
3. Add chopped green chilies. You can omit if you are making for your kids.

DSC02264
4. Add chopped onions, fresh coriander leaves and grated ginger.


DSC02265


DSC02266


DSC02268


5. Season with Salt and Red chili powder


DSC02269


DSC02270


6. Add Garam Masala and Coriander Powder and Besan or Chickpea Flour.


DSC02271


DSC02272


7. Mix them thoroughly and using your hands roll them into small discs or croquettes.


DSC02273


DSC02275


8. Heat oil in a wok and submerge them. Fry them on both sides till they become brown and crispy.


DSC02278


DSC02279


9. Remove them on a paper towel to absorb extra oil.

DSC02280

10. Serve them hot with Onion Rings and lemon wedges. You can also serve them with Good old fashioned Ketchup or Mint Chutney.

Other snacks you can try here : Arbi Ke Patton Ke Pattode, Baked Paneer Corn Kebabs, Healthy Kachalu Aloo Chaat, Sabudana Tikki.

VegShammiKebab_Featured1[whohit]VegShamiKebab[/whohit]

[yumprint-recipe id=’162′]


KadaiMushroom_FeaturedBlog3
Mushroom!! I am a self proclaimed biggest mushroom fan. This fact is not unknown. My blog is an evidence of this as it is full of mushroom and bread recipes. Not to mention there are so many more in the pipeline ;). My love for mushroom has grown leaps and bounds over years. This recipe of Kadhai Mushroom literally translating to Mushroom in a wok in a classic Indian recipe which is made with freshly ground spices which makes all the difference.

KadaiMushroom_FeaturedBlog2

I was looking for this recipe for a long time and then came across this recipe of Shilpi from Foods And Flavors By Shilpi. I must say it was amazing! Just like the way they serve at a good Indian restaurant. I was in a mushroom haven.

Directions: 

1. Chop some fresh button mushrooms, firm capsicum and onions in big chunks. Set aside.

DSC02333
2. For the gravy finely chop another onion, tomatoes and green chilies. Set aside.

DSC02334
3. For the dry spice mix. Add whole coriander seeds, cumin seeds in a small pan.


DSC02335


DSC02336


4. Also put black peppercorns and red dry chillies. Dry roast them on medium low flame for couple of minutes till they start to crackle, Keep tossing them for you wouldn’t like to burn them 🙂


DSC02337


DSC02338


5. Place them in a dry grinder or coffee grinder on getting cool and blitz them into a coarse powder. Set aside.


DSC02339


DSC02344


6. For the gravy, in a pan add half of the ghee or clarified butter. If you are a vegan you can use any other cooking oil.

DSC02340
7. Add onions and chopped green chilies and saute them till the onions become soft and translucent.

DSC02341
8. Add tomatoes and salt and cook them till the tomatoes turn soft and gooey.


DSC02342


DSC02343


9. As it cools down place it in a grinder and make a smooth puree. Set aside.


DSC02345


DSC02346


10. In the same wok add rest of the ghee or oil and add ginger garlic paste. Saute till the raw aroma of garlic fades away.


DSC02347


DSC02348


11. Add the dry spice mix and saute for a minute or so.

DSC02349
12. After this add the pureed tomato onion paste. Keep cooking till the oil separates. This can take about 7-10 minutes.

DSC02350
13. Add chopped mushrooms to the masala and toss them together. saute them for 5 minutes.

DSC02351
14. At this stage add chopped capsicum and big chunks of onions. If you like you could even add bell peppers to bring in additional flavours and colour.

DSC02352

15. Saute them for a minute or so and add a cup of water to the masala. Let the gravy boil for 5 minutes.

DSC02353
16. Switch the flame off and add fresh cream to make it rich. 

DSC02354
17. Add little kasuri methi to give it restaurant like flavour. 

DSC02355
18. Serve hot with Roti or Laccha Parantha or even Tawa Naan.

Other Mushroom Recipes you can try here are: Mushroom Do Pyaaza, Malai Bell Pepper Mushroom, Chilli Mushroom, Mushroom Risotto, Italian Frittata with Mushrooms and Spinach, Mexican Casserole Eggs with Mushrooms and Chili Poblano, Mushroom Lasagna in Bechamel Sauce.

KadaiMushroom_FeaturedBlog1[whohit]KadhaiMushroom[/whohit]

[yumprint-recipe id=’161′]

Vegan Chocolate Banana Cake


Who doesn’t like chocolate. And when this incredible flavour is infused with banana it becomes a divine combination. It doesn’t just end here..what if this combination is guilt free and vegan? Here’s new newest recipe of Chocolate Banana Cake which is eggless, butterless and also dairy free. I have used Flax seeds to make it rise and become fluffy. I had done another Eggless Whole Wheat Banana Bread with Melon Seeds earlier. But this recipe takes this bread to a new level of craziness.

Vegan Chocolate Banana Cake

 
The most enticing part of this bread was its texture. It was soft and gooey and almost melted in my mouth in its very first bite. The ripe unforgotten bananas were put to right use. My little one who is a picky eater devoured this greedily and barely allowed me to take photographs 🙂

Directions:

1. Soak Flax seed Powder in water and set aside (Learn here how to make Flax seed powder). The mixture should become like a gel in some time.


DSC02032


DSC02033


2. Grease a baking pan and set aside. I am using a medium size bundt pan for this. Preheat the oven on 180 degree Celcius for 10 minutes.

DSC02037

3. In another bowl sift All Purpose Flour, Baking Powder and Baking Soda. Do you see the lumps in the baking powder? That is why we are sifting everything for a lump free airy flour.


DSC02035


DSC02036


DSC02038


4. This is how it looks after sieving.

DSC02039
5. Also sieve and add cocoa powder to the flour and gently combine. Set aside.


DSC02040


DSC02041


6. Mash overripe bananas with a fork and place in a mixing bowl. Add vegetable oil and combine. 


DSC02034


DSC02042


7. Add the flax powder gel to the bananas.

DSC02043
8. Add brown sugar or jaggery powder and vanilla extract. Give everything a good mix.


DSC02044


DSC02045


9. Add the wet ingredients to the dry ingredients and gently mix with the spatula. Do not over mix simple moisten the flour.


DSC02046


DSC02047


10. Pour this in the greased pan and bake on a preheated oven for 20-25 minutes on 180 degree celcius (Learn more about Oven temperatures and Conversions). The test of doneness is that the toothpick inserted will come out clean.

DSC02048
11. Let the cake cool down a little before taking it out of the pan. Invert the pan on a serving plate and gently tap to remove the cake. Slice and serve with your favourite cup of coffee or tea.

Related post: How to make Flax Seed Powder or meal?

Other cake and bread recipes you can try here : Apple Raisin Streusel Bread, Persimmon Rum Cake, Surprise Heart Inside Cake, Pumpkin Cake Rolls, Lemon Cake with Lemon Glaze, Eggless Orange cake with candied Orange Peel Filling, Wacky Vegan Chocolate Cake, Eggless Almond Vanilla Cake, Chocolate Vanilla Marble Cakecak.

Vegan Chocolate Banana Cake


[yumprint-recipe id=’160′]


Amaranth Saag

I just attended my brother’s wedding last week and I realised I was much plumper than before (I don’t wanna demean my self by calling fat :P). So on returning back my husband and me decided to go on good healthy diet with proper exercise. Its been a week and we still seem to be on the right track. I have been avoiding sweets and cheese and bringing in more vegetables and proteins in my diet. One such vegetable is the nutritious leafy vegetable which is known as Cholai or Chaulai in Hindi and Amaranth or Amaranthus in English. I made this stir fried Amaranth Leaves with spices.

Amaranth Saag
 Grains of Amaranth  are also used in food and are very good  source of energy. I found these leaves in the farmer’s market and quickly decided to make something out of them. The colour of leaves vary from purple to red and green to gold. I have used the former types as I love these colours but you can use any variant. Amaranth leaves are good antioxidants and good source of Vitamin A and Vitamin C. If you eat amaranth in leafy form, it acts as a good roughage and helps cure constipation. It is very easy to cook amaranth. Its a simple recipe with bountiful of nutrition. 

Directions: 

1. Separate the leaves from the stems. Place them together.


DSC02475


DSC02419


2. Wash the leaves thoroughly as there can be a lot of grit in the leaves.

DSC02420
3. Chop them coarsely and set aside.

DSC02421
4. In a wok or karahi add clarified butter or ghee and turn the flame on. Vegan may use any other cooking oil.

DSC02422
5. Add Cumin seeds and A bay Leaf.


DSC02423


DSC02424


6. Add Ginger Garlic paste along with chopped green chilies and saute them until the raw fragrance of garlic diminishes.

DSC02425
7. Add onions and continue to saute till the onion becomes soft and translucent.

DSC02426
8. At this stage add the chopped cholai leaves and toss them with the onions. 

DSC02427
9. Season with Salt, red chilli powder.


DSC02428


DSC02429


10. Also add coriander powder and Garam Masala.


DSC02430


DSC02431 


11. Cook on medium low flame, uncovered until soft and thoroughly cooked. Serve hot with Chappatis.

Other simple everyday recipes you can try on The Secret Ingredient: Tori Wadi, Masaledar Arbi, Baingan ka Bhartha, Langar Wali Dal.
Other dishes with Leafy vegetables you may try: Palak Paneer,  Aloo Methi, Arbi Ke Paton Ke Patode, Pudina Pulav, Methi Matar Malai.

Amaranth Saag

[yumprint-recipe id=’159′]


CousCousSaLad_Featured1

I was introduced to Couscous in Mexico. Couscous is a traditional North African dish made with semolina and cooked by steaming it. Its a staple food throughout the North African cuisines of Tunisia, Algeria, Morocco, Mauritania and Libya. But owing to its nutritional benefits its becoming very popular all across the globe. Couscous is made by sprinkling semolina with water and rolled with hands to form small tiny balls. It is then sprinkled with dry flour to keep them from sticking. These small balls or pellets are then steamed and cooked.

CousCousSaLad_Featured2

In a modern scenario couscous is available as instant couscous which requires soaking in hot water for 5 minutes. For this salad I have used Instant Couscous. The salad featured in Laura Vitale’s Webspace and I was so determined to try it. I found couscous and made it. It was sooo delicious, filling and refreshing. Its a boon for all weight watchers. The salad can be made with any fresh vegetable you like. You can use green onions, boiled beans even blanched beans.

Directions:

1. In a sauce pan add some water and bring it to a boil. Turn the flame off.

DSC03006
2. Now add equal quantity of couscous to the water. Let it get soaked and cooked for 5 minutes. Put the lid on and let it rest.


DSC03007


DSC03008


DSC03009


3. Peel a fresh cucumber. I partially peeled it for an amazing texture. Also deseed it using a spoon.


DSC03010


DSC03011


4. Chop Cucumber into bite size pieces. Also chop onions and tomatoes. I have used cherry tomatoes you can use any. Set aside.

DSC03012
5. For the vinaigrette, in a bowl add zest of a lemon. Also add lemon juice.


DSC03013


DSC03015


3. Add Extra Virgin Olive Oil and season it with salt and pepper.


DSC03016


DSC03017


DSC03018


4. Add chopped veggies to the  vinaigrette along with boiled chickpeas.


DSC03019


DSC03020


5. Top it with fresh chopped parsley and combine everything.

DSC03021
6. Fluff up the soaked couscous with a fork.

DSC03022
7. Season it with salt and pepper.


DSC03023


DSC03024


8. Add couscous to the veggies and combine. Check for additional salt and pepper.

DSC03025
9. Serve at room temperature or refrigerate overnight to enhance the flavours. Its a full meal in itself.

You can even try Fresh Mexican Black Bean Salad with Mangoes, Avocado Parsley Pasta, Sundried tomatoes Pasta Salad, Thai Green Papaya Salad Recipe.
[whohit]CouscousSalad[/whohit]

CousCousSaLad_Featured3

[yumprint-recipe id=’158′]


There is a story behind this Andhra Style Mango Rice. This year I have been lucky for I made so many recipes with raw mangoes which I received from my home tree from my parents. I went crazy and made Instant Raw Mango Pickle South Indian Style, Sweet and Sour Mango Chutney, Aam Ka Panna, Raw Mango and Mint Chutney. When a few mangoes were left almost turning yellow I decided to do this Andhra style Manga Sadam or Mango Rice. It was incredible!!!


There is another version of this rice and also from Andhra Pradesh which uses freshly grated Coconut. It is often made on the occasion of Maavinakayi Chitranna. But the recipe I am posting is simpler and you would probably have all the ingredients at home.

Directions:
1. Wash and soak rice in a bowl for 15 minutes. Cook in a pressure pan that every rice grain remains separate. Keep aside. In the meanwhile peel some raw mangoes and grate them using a grater.


DSC01819


DSC01820


2. In a wok or karahi add some oil. And heat it up.

DSC01821
3. Add mustard seeds and let them crackle. 

DSC01822
4. Add Urad Dal and Channa Dal. Toast them in oil for a few seconds on low flame till they are nice and golden.


DSC01823


DSC01825


5. Add Kaddhi Patta and saute for a second.

DSC01826
6. Add peanuts and dry red chilies. Toss them in the oil.


DSC01827


DSC01829


7. Add asafoetida and turmeric powder.


DSC01830


DSC01831


8. Add grated raw mango and mix well for a few seconds. 

DSC01832
9. Add red chili powder and Salt. Mix well and turn the flame off.


DSC01833


DSC01834


10. Gently mix the Mango Masala  to the cooked rice.

DSC01835 
11. Serve hot with Instant Mango Pickle South Indian Style and some Papads.

Other Rice recipes you can try here : Curd Rice, Kathal ki Biryani, Mint Pulav , Mushroom Risotto

[yumprint-recipe id=’157′]