Tag

Vegetarian

Browsing

You have old, dying ,neglected bananas? You dont know what to do with them? Don’t worry! I am here to salvage you from this situation. I just realised I am sounding like a Superman or may be Superwoman :B Well last week my husband was going for a treacherous Himalayan Trek and demanded (ohk! politely asked) if I could make him some energy bars and something healthy which he can take along and munch on his way and remain energized. My baker mind went in all directions. I of course could have made him my super yummy Amaranth Granola Bars or Oats and Almonds Energy Bars but then I saw an opportunity to make something new which can be put on the blog. I saw some decaying bananas and I had a huge pack of Peanut Butter and there it was – uber delicious Whole Wheat Banana Peanut Butter Brownies!!


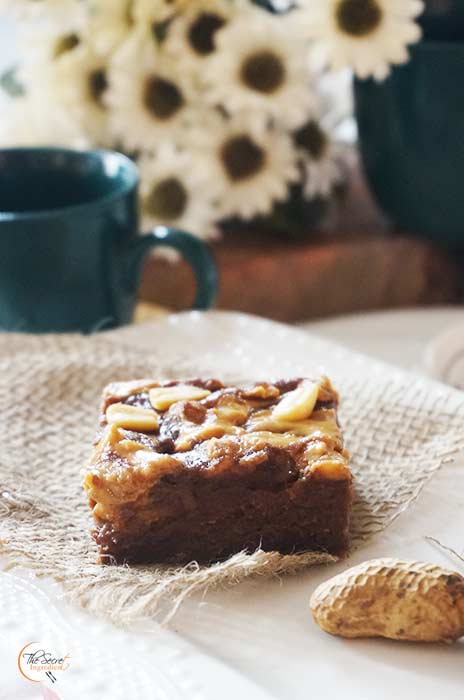
I spent 3 hours thinking what to make for him and 20 minutes to get everything ready. These gooey brownies were so decadent loaded with flavour of chocolate and peanut butter that I made a double batch. Saved half for myself and rest went for trek. These brownies used no eggs and still were sinfully indulgent. My jinx is still intact. I still have a reputation for making healthiest brownies on this planet. If you dont know I have on my blog Whole Wheat Oats & Chocolate Brownies,  Gluten Free Chocolate Ragi Brownies ,Vegan Avocado Chocolate Brownies, Vegan Yellow Zucchini Chocolate Brownies and now these Whole wheat Banana Peanut Butter brownies. I hope someday I can make some unhealthy brownies 😉 But if you ever try these indulgent brownies let me know your feedback. Till next time!

Directions:

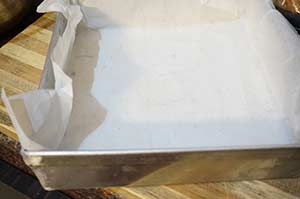
1.  Line a 9×9 inch baking pan with some parchment paper and preheat your oven to 180 degree Celsius (Learn more about Oven temperatures and Conversions). 


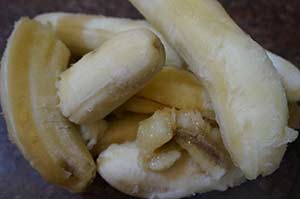
2. In a bowl add over ripe bananas and mash them well. You can leave them chunky or make them smooth.


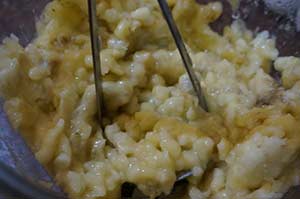
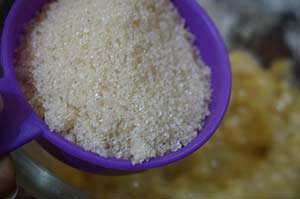
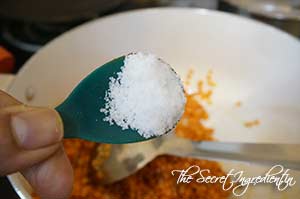
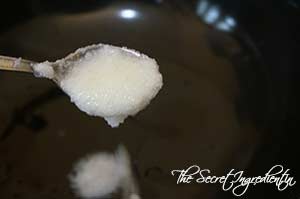
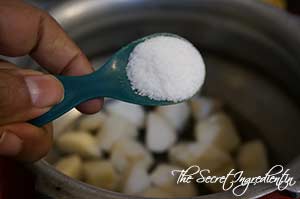
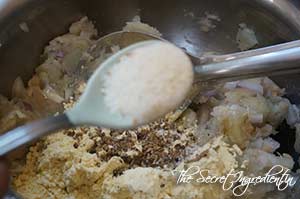
2. Add sugar. I have used SOS Organics Khandsari Sugar which is unrefined and makes these brownies more delicious. Whisk well till the sugar is combined with the bananas. 


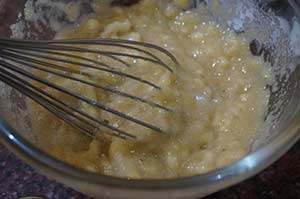
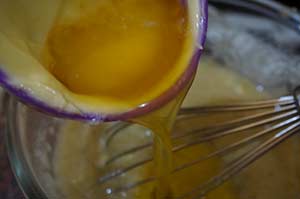
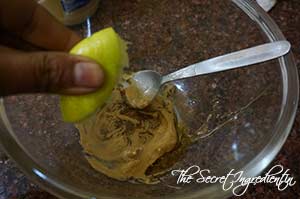
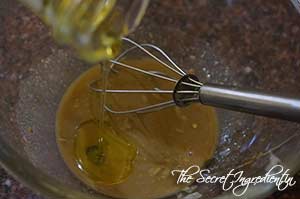
3.  Add melted butter and vanilla extract. Mix well.


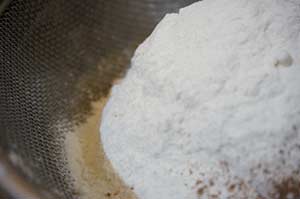
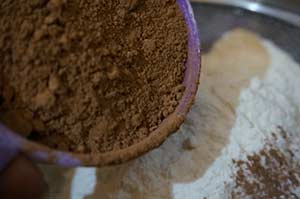
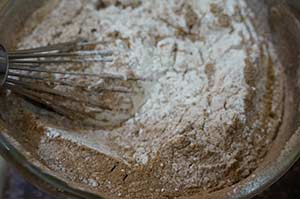
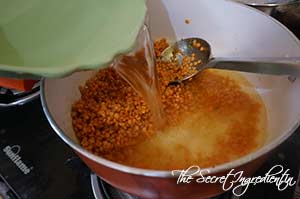
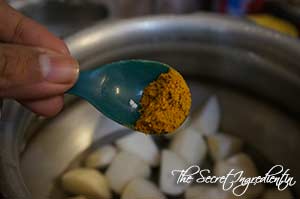
4. Add sifted whole wheat flour to the wet ingredients along with unsweetened cocoa powder.


5. Mix everything well till you get an even textured batter.


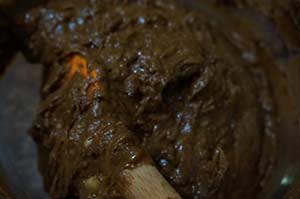
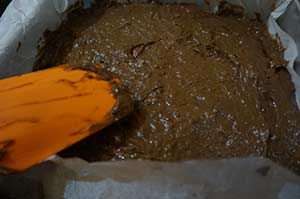
6. Pour the brownie batter in the prepared pan and even the top with the help of a spatula.


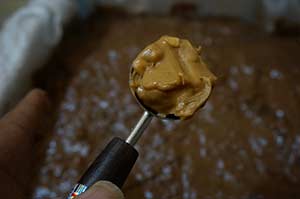
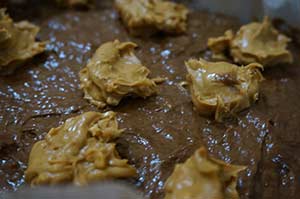
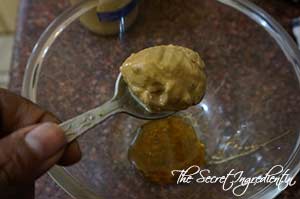
7. Take small scoops of peanut butter and place them all over the brownie batter.


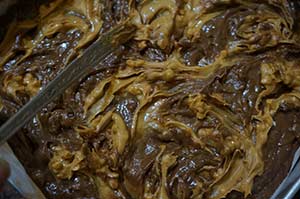
8. Take a toothpick and randomly make swirls so that the peanut butter spreads all over and mixes with the brownie batter and creates a wonderful pattern.


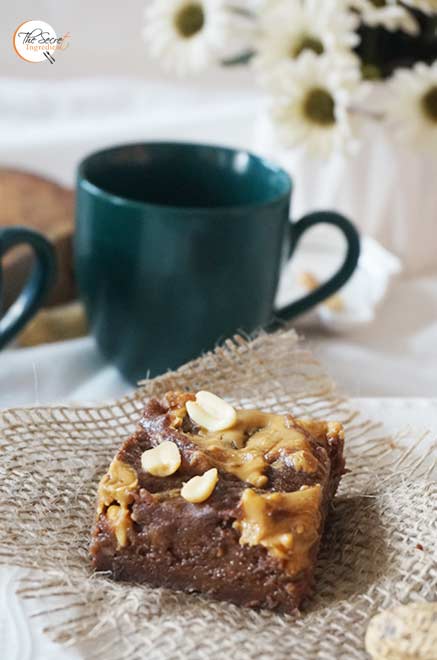
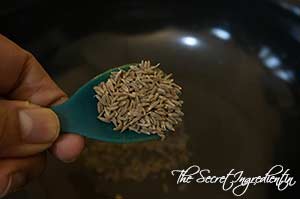
9. Top it with roasted Salted peanuts and bake them in the oven for 20-25 minutes or until a skewer inserted in the centre comes out clean.


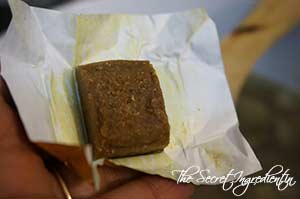
10. Remove from the pan and let it come to room temperature . Slice it into squares and serve.

Other healthy brownies you can try on my blog are: Whole Wheat Oats & Chocolate Brownies,  Gluten Free Chocolate Ragi Brownies ,Vegan Avocado Chocolate Brownies, Vegan Yellow Zucchini Chocolate Brownies

[yumprint-recipe id=’305′]

Paneer or Cottage Cheese is one of the most trusted and popular ingredient specially for vegetarians in India. It can be used in so many recipes and  the outcome is always rich, soft and creamy. Other paneer recipes I have posted on my blog require some sort of preparation and time. But this malai paneer recipe is quick. If you have guests coming and you want to cook  something in a jiffy this is what you should try. It’s not just a quick fix recipe but it will guaranteed leave them wooed.

I learnt this recipe from a very dear friend Harpreet. She had invited us to her house for dinner. Along with other to-die dishes she had made this delicious Malai Paneer. And oh Boy! we were all sold out. I asked her the recipe right there and since then I have been further wooing my guests with this. I wanted to share this recipe with my readers for a very long time but every time I have made this, the serving bowl has been polished off leaving it sparkling clean 😉 Thankyou Harpreet Bhabhi, this yummy post is dedicated to you. Cheers to our friendship :* and to many more delectable recipes.

Let me know if you try this recipe and like it. I’ll be eagerly waiting to hear from you. 

Directions:
1. Cut fresh Paneer into half inch cubes and set aside.


2. Finely chop onion and tomatoes and set aside. 


3.In a wok add ghee.

4. Add chopped onions and saute them till they turn soft and acquire pinkish colour.


5. Then add chopped tomatoes and salt and continue to cook till the tomatoes become mush and soft.


6. Add Kashmiri red Chilli which gives a vibrant colour.


7. Add Cream or use whisked malai or milk skim and stir everything together.  Add 1/4th cup water and simmer it for 2 minutes.


8. Add cubes of paneer to the creamy gravy and mix everything together.

9. Simmer for 5-7 minutes till desired consistency is reached. Add Kasuri Methi  and mix well. Kasuri Methi is the most important ingredient so should not be skipped.


10. Garnish with freshly chopped coriander leaves.


11. Transfer it to a serving bowl and serve with hot Rotis or Naan.

Other Paneer recipes you can try are: Restaurant Style Mughlai Shahi Paneer Achari PaneerPalak PaneerShahi PaneerPaneer Ki KheerBaked Paneer Corn KababsStuffed Buns with Spicy Paneer.

[yumprint-recipe id=’301′]

So the green mango saga continues. I had about 6-7 kgs of unripe green mangoes from my parents yard and I wanted to try out new recipes. Last week I had made Sweet and Sour Aam ki Launji which was simply phenomenal. I had asked for suggestions from my blogger friends if they could suggest a few recipes which could be made with unripe mangoes. My talented friend Rhea from the Food blog Euphorhea suggested Mango Dal which is unripe mango cooked with lentils. The idea kinda fascinated me. I tried it and the result was amazing. The dal was yummilicious with the tangy flavour of green mangoes.


I love anything which has temper of kaddi patta and mustard seeds. I don’t say it a lot but I feel I like South Indian food a lot. The tanginess of tamarind which is infused in sambhar or any dal is quite enthralling to my taste buds. And when this tanginess is absorbed by idlis or dosas …aah! the level of awesomeness achieves new heights. 

I finished one bowl of dal all by myself, even before the lunch was served. Quality testing is very important (yeah right!). A small change I did to her basic recipe was that I added ginger garlic paste to the dal which I think gave a lot of texture and taste to the lentils. 

If you have unripe mangoes you must give this dal a try. It will not disappoint you. And if you are looking for more unripe mango recipes you can check the links. I have listed all the possible things I have tried with green mangoes. This list is non conclusive as I am adding more things every day till the season of mangoes dies down for this year 🙂

Directions:
1. Wash and soak lentils in water for half an hour. I have used Masoor Chilka or Red Lentils without the skin. You can use any lentils which gets cooked readily.


2. In the meanwhile peel and chop some unripe green mangoes into cubes and set aside.


3. In a sauce pan add some oil and add drained lentils and saute them for at least 5 minutes.


4. Add ginger garlic paste and continue to saute with the lentils till the raw smell of garlic fades away. 


5. Add turmeric powder, red chilli powder and salt.


6. Add water to the lentils and bring it to a boil. Then cover with a lid and continue to simmer till the lentils have cooked. It should take from 10-15 minutes. 


7. In a wok add some ghee and add mustard seeds and cumin seeds. Let them crackle.


8. Also add dried red chilli and toss it in the oil to release flavours.


9. Add mango cubes and kaddi patta and cook them in the wok till mango cubes are cooked .


10. Add the boiled lentils to the mango temper and continue to cook for another 5-7 minutes on simmer. Check for salt.


11.  Serve hot with chapatis or roti or parantha.

Other recipe you can try with unripe green mangoes are:  Kaccha Aam Aur Lehsun ChutneyFresh Turmeric Pickle with Green Mangoes Raw Mango RiceAam Ka PannaRaw Mango Chutney with Mint and CorianderKhatti Meethi Kacchey Aam Ki Chutney Instant Raw Mango Pickle South Indian Style, Aam ki Launji.

[whohit]MangoDal[/whohit]

[yumprint-recipe id=’279′]

Last week I had posted my Watermelon and Feta Cheese Summer Salad Recipe which was appreciated by a lot of you. Many had requested me to share more such fresh salad recipes to beat the heat. It’s practically impossible for me to eat anything greasy and rich during summers. I can simply live on fresh salads. They not only soothe my soul but are a great detox. I can have one meal of just salads. This apple celery salad is very simple and requires no spadework and can be made in a jiffy. The dressing of Mustard Vinaigrette pairs so well with the sweetness and crunch of apples and the zing of celery.

Every salad needs that nutty flavour which balances the acidity and the crispness of vegetables. The toasted walnuts and pomegranate actually perform this role and trust me they are good. I will be posting more such salad recipes so keep watching the space and subscribe to my social media handles on Facebook, Instagram and Pinterest.

Directions:

1. Core and chop some fresh apples and place them in a salad bowl. Also add celery leaves and its tender stems.


2. Add chopped and toasted walnuts to the bowl along with pomegranate arils.


3. For the dressing add honey in a separate bowl and to this add dijon mustard sauce.


3. Squeeze in a juice of lemon and also add olive oil. Whisk everything together.


4. When you are ready to serve pour this dressing over the apple celery mix and toss everything well. 

5. Serve as it is.

Other Salad recipes you can try are:Watermelon and Feta Cheese SaladThai Green Papaya Salad RecipeCharred Peppers Salad with Anchovy White BeansCouscous Salad with Chickpeas in Lemon Olive Oil VinaigretteFresh Mexican Black Bean & Mango SaladSautéed Red Bell Pepper and Olive Pasta SaladSundried Tomatoes Pasta SaladGrilled Chicken SaladIndonesian Style Patni Red Rice Salad With Boiled Eggs in Pomegranate Molasses Sauce , Apple Spinach & Cranberry Salad.


[whohit]AppleCelerySalad[/whohit]

[yumprint-recipe id=’277′] 


Last Night was Saturday night party at my place. Along with some cocktails we had some heavy snacks! Now I wake up with a bloated tummy and a guilty conscience. To fix both these things I needed to make this Green detoxifying smoothie which will revive my stomach and clear my body of all the toxins. This smoothie doesn’t use any dairy and is free from all sort of sugars. 

Its even ideal for people who are watching their weight. I like to include this smoothie in my diet at least once a week. If you are also fond of smoothies then you must check out a few other recipes of Smoothies on my page. Some links I have mentioned at the end of this post. What kind of smoothie do you like? I would like to know your opinion. Would love to hear from you.

Directions:
1. In a blender add thoroughly washed leaves of Spinach and a peeled banana.


2. Add one cored green apple. 


3. Add roasted seeds of Flax.


3. Add Water to the blender.

4. Also throw in some ice cubes.

5. Pulse till everything is smooth. Pour into glasses and drink it up immediately. This is detoxifying and quite refreshing.

Other Smoothies and Beverages  you can try are: Plum Smoothie Raw Mango Drink with Mint and Roasted CuminGinger Papaya Mint Smoothie Central Himalayan Wild Bayberry SyrupLitchi LemonadeMango Chamomile-Mint Tea LemonadeKiwi Chia PuddingPeach LemonadeSpiced Mango Lassi, Melon Cucumber and Mint Smoothie, Orange and Blueberry Smoothie.

[yumprint-recipe id=’272′]

I am returning after a very long gap. My father was hospitalised and it was a very tough time for my family. With God’s grace he is alright now and recovering very well. I have been away from my kitchen for almost 2 months. I have been cooking but havnt been developing any recipes for the blog. This has made me very restless. I feel my expressions are lost. I am soon getting back into the groove. Thank You for your patience and your support while I was gone. 

Not only I have been away from baking and cooking but by exercise regime has also been compromised. Although there hasn’t been much of a weight increase still I feel I need to start working out again and feel better. Since I have returned I have been eating a lot of salads and drinking a lot of smoothies. I love smoothies and like to try new variants to make life more fun and delicious. This time I came up with this Orange Blueberry Smoothie. The pastel pink purple colour says it all.. It was fresh, refreshing and oh so delicious! Oh well with same flavours you can even make Orange Blueberry Pound Cake.

Directions:
1. In a blender add some orange juice. I have used freshly squeezed juice you can use from the box.


2. Add blueberries fresh or frozen. I had frozen on hand. Also add plain yogurt. You can use greek yogurt also. 


3. Add honey or maple syrup for sweetening it.


4. Blend and serve. You can also add ice cubes if you like.


5. Serve in a tall glass with a slice of Fresh Orange and make your day beautiful.

Other Smoothies and Beverages  you can try are: Plum Smoothie Raw Mango Drink with Mint and Roasted CuminGinger Papaya Mint Smoothie Central Himalayan Wild Bayberry SyrupLitchi LemonadeMango Chamomile-Mint Tea LemonadeKiwi Chia PuddingPeach LemonadeSpiced Mango Lassi, Melon Cucumber and Mint Smoothie.

[whohit]OrangeBlueberrySmoothie[/whohit]

[yumprint-recipe id=’271′]

Sometimes we have raw materials in abundance around us and we tend to ignore them. These green Jalapeño peppers and Red Fresno Chilies are widely available in winters and we Indians use them to make Stuffed Pickles. But most of us dont realise we can also use them to make pickle for our Pizzas, Pastas and Salads. It can be done in fifteen minutes and your jar will stay good for a year without the use of any chemical preservative. Why do we need to buy from the store then?

I made a huge jar with these green Jalapeños and gifted them to my mother. Now when I spotted the red Fresno Chilies I am going to treat them in the same way. While I am typing this post those chillies are basking in the sun after I have washed them. So you can replace the green chillies with the red ones. The recipe remains the same.

Directions:

1.  Take fresh chillies and omit the ones which are bruised.  Wash them well.


2, Pat them dry using a kitchen towel or put them in the sun for half an hour.


3. Trim the tops of the Jalapenos and slice them into rings. If you feel your chillies are way too hot you can remove the seeds.


4. Smash two cloves of garlic. Add water in a pot and put the cloves in.


5. Add distilled White Vinegar, sugar and salt.


6. Once the liquid comes to a boil and the sugar and salt are dissolved. Add the Sliced Jalapeños into the vinegar water bath. 


7. Turn the flame off and let the peppers sit in the bath for 10-15 minutes. You will see a gradual change in colour of the peppers. Its the vinegar which is working. 


8. Use tongs to remove the Jalapeños from the pot to the jar. 


9. Once the peppers are in the jar, fill it up with the liquid brine from the pot. Use a ladle that will ease the process of transfer.

10. Let it cool down and come to room temperature and then you can put the lid on and refrigerate it. It stays good for a year or as long as it lasts. 

Other Recipe you can try using Green   Jalapeños  or Red Fresno Chilies:  Stuffed Red Chilli Pickle, Red Chilli and Red Bell Pepper Jam.

[whohit]JalepenoPickle[whohit]


shalgamkasaag_featured1

Turnips are one of the most hated vegetables on the planet, this is a brutal and honest fact. This root vegetable is known as Shalgam in Hindi , শলগম Shalgom in Bengali,  Kalamohare, Sherasa in Marathi, An-tam in Mizo,  Nalla avalu in Telegu, and has many other names worldover like  swede, neeps, rapes, rapa. Irrespective of its repute this vegetable is loved in my family. We not only eat it raw in our salads but also make its curry, which I will share soon and also its pickle, which is a must for the winters. As a kid my mother ensured I eat all types of vegetables which making faces. As I am writing this, a thought comes to my mind. My mother made all these despised vegetables so delicious that I never learnt to make faces. I guess that explains why I always encourage people to try out recipes from my mother if they ever hate any vegetable. You will find plenty on my space. 

shalgamkasaag_featured3
My husband was one of those kids who always hated this sabji. So when my mother in law challenged me that I should make his son try this vegetable I was most happy to successfully convert him into a shalgam acceptor (I am not writing lover because you know old fears die hard :P). This vegetable is full of fibre and nutrition and you must try it out.

Directions:
1. Remove the leaves of the turnips. Dont discard them, the fresh ones can be added to salads. Wash the turnips.

dsc09482
2. Remove the top thick skin and cut each into four pieces.


dsc09483


dsc09485


3. In a pressure pan keep a rack in the bottom and place the turnip on it. Add little water.

dsc09486
4. Also add salt, turmeric powder and red chili powder.


dsc09487


dsc09488


dsc09489


5. Close the lid of the pan and cook on high till first whistle or when it has reached its optimum pressure, then turn the flame on low and keep it simmering for another 10 minutes. It should be soft on poking.

dsc09490

6. Drain the water and place the boiled turnips in a bowl. Mash them using a potato masher,


dsc09491


dsc09492


7. Chop tomatoes, ginger and green chillies.

dsc09493

8. Add ghee or clarified butter in a wok. This recipe requires a good quantity of ghee as it is a key ingredient for the deliciousness of the dish. Do not cut short.  Also add chopped ginger and saute for a minute then add chopped tomatoes and green chilli and keep sauteing it till the tomatoes turn soft and gooey.


dsc09494


dsc09495


dsc09496


9. Season with salt this helps to soften the tomatoes faster.


dsc09497


dsc09498


10. Add mashed turnips and mix well with the tomatoes. 

dsc09499
11. Add chopped green Coriander and garam masala. Check again for salt or red chilli. If you find it less you can adjust at this stage.


dsc09500


dsc09502


12. Keep the turnips on a medium  flame and stirring till you see the ghee has started to ooze out and it has just about to start sticking to the base. That’s when you must turn the flame off. 

dsc09504
13. Transfer it to a serving bowl and enjoy this delicious dish with hot rotis. This will make you fall in love with its flavour. 

Other punjabi recipes you can try are: Dal Ghiya with Punjabi VadiyaPunjabi Pethey Ki SabziPunjabi Style Bharwan TindaPunjabi Style Gobhi DanthalLangar Wali DalPunjabi Style Dum AlooPunjabi Dal MakhaniPunjabi Style Aloo MethiPunjabi Pindi CholeyPunjabi Style Kaddi Chawal.

shalgamkasaag_featured2[whohit]ShalgamKaSaag[/whohit]

[yumprint-recipe id=’259′]

creamofmushroom_featured5

By now I must stop yapping about my love for mushrooms. Its a known fact and needs no more proof. I have 15 recipes of Mushroom on my blog already what else needs to be said. If you give me just mushrooms, I can happily spend my entire life eating Mushrooms 🙂 If I hadn’t included this classic recipe of Cream of Mushroom Recipe this collective would have been totally incomplete.  This time I promised my self to take pictures before all of it is devoured.  This recipe doesn’t use any flour to thicken the soup. But if you like you can add 1 tablespoon All purpose flour to it. This soup is a haven for all mushroom Lovers. I often team it up with my fresh homemade Whole Wheat bread.

creamofmushroom_featured1

Its very easy to put together. Even bachelors can make this and doesn’t require much time and effort. The quantity of cream can always be adjusted and the soup can be made healthier as per your need.  If you are looking for other soup recipes you can find the links below.

Directions:
1. Wash Mushrooms for any grit and pat them dry using a kitchen towel. Chop them into thin slices and set aside. Also chop Onions and garlic.


dsc00100


dsc00101


2. In a pot add some olive oil and also add chopped garlic and onions. Saute them till they have become soft and onions have turned pink. At this stage add sliced mushrooms and and toss them with onions and garlic.


dsc00102


dsc00104


dsc00105


3. Add thyme and Parsley. I used both in dried form. Mix together with the mushrooms. Add All Purpose Flour to the mushrooms and saute for a minute. This will make the soup more thicker. This is purely optional.


dsc00106


dsc00107


4. Turn the flame on low and cover it with a lid. Let mushrooms sweat out and release water. This should take about 5-7 minutes.


dsc00108


dsc00110


5. Add water and a cube of vegetable broth. You can even use fresh broth if you like.


dsc00111


dsc00112


6. Season with salt and pepper. You can also add a pinch of nutmeg.


dsc00113


dsc00114


7. Cover it once again and let it come to a boil. Remove the lid and turn the flame off. Puree the mushrooms using a hand blender or instead you can use a conventional blender till everything becomes smooth.


dsc00116


dsc00117


dsc00118


8. Return it back to the flame and bring it to another boil. Add cream and combine. 

dsc00120
9. Transfer it to a serving bowl and garnish with chilli oil and add freshly chopped herbs. You can serve it with fresh home made bread. This soup is truly heartwarming. 

If you are looking for other soup recipes you can try: Classic Russian BorschCream of Asparagus SoupCream of Broccoli Soup with ChivesPeas and Mushroom Spicy SoupClassic French Potato Leek SoupMexican Red Kidney Beans Soup With Baked Tortilla ChipsTomato Soup , Zucchini Garlic Soup with Yak Cheese ShreddingsChicken Soup with Rice.

creamofmushroom_featured2[whohit]CreamOfMushroomSoup[/whohit]

[yumprint-recipe id=’250′]

plantainkebabs_featured1
If you are a North Indian its likely you will miss using a few ingredients which are fundamental to South Indian Cooking. For example use of Coconut Milk, Coconut Oil (in food not for head massage), Yam, Plantain and many others. When I started blogging I broke the stereotype and gave them all a try. I must say the Coconut Milk has become an essential ingredient in my kitchen. I have been making a lot of Thai dishes using Coconut Milk. Apart from this I also tried Plantain or unripe bananas. When I saw plantains in my farmers market I grabbed them readily and decided to play with them. These Plantain and Potato Kebabs were a result of my trials and they were a delight. I air fried them for guilt free indulgence and served them with Harissa and Sweet Chilli Sauce.

plantainkebabs_featured2

Since I have been gifted with an Air Fryer I am leaving no stones unturned to try out snacks in this mean machine. It not only makes us try delicious things but at the same time without feeling guilty about it. Our weights are under control and we are having a ball eating new kebabs 😛 Why dont you try these out.

Directions:

1. Take some plantains or raw green bananas and cut them into pieces without peeling off their skin. 


dsc08430


dsc08432


2. Place them in a pressure pan along with potatoes and water. Boil them till they have softened. You can boil them in a normal saucepan oil. Peel the skin on potatoes and plantains  and set aside in a bowl.


dsc08435


dsc08557


3. Mash the potatoes and plantain with a masher and add ginger garlic paste and combine.


dsc08558


dsc08559


4. Add chopped onions, chickpea flour or besan and garam masala.


dsc08560


dsc08562


dsc08564


5. Add salt and Red Chili powder.


dsc08565


dsc08568


6. I like to add Tandoori masala to the kebabs for the extra zing. But its totally optional. Aldo add some chopped coriander leaves.


dsc08567


dsc08585


7. Mix everything together to form a dough .

dsc08586
8. Preheat your Air fryer to 180 degree C for ten minutes and if you are using oven you can preheat the same on 180 degree C. Also brush the wire gauze basket of Air fryer with some oil so that the kebabs do not stick. In case of Oven line a baking sheet with parchment paper and set aside.

dsc08587
9. Shape the dough into tikkis or kebabs or into patties and place them in airfryer and brush the top with little oil.


dsc08588


dsc08589


10. Air fry them for 18 minutes and halfway flip the kebabs and brush with oil on the top side and continue to bake until it’s got some golden hue. Enjoy with Ketchup, Mint Chutney, Spinach Coriander Chutney, Pesto or any dip of your choice. 

Other kebabs and croquettes you can try are: Tapioca CroquetteBaked Paneer Corn KababsVeg Shami KababAirfried Yogurt & Cottage Cheese Kebabs for Fasting , Baked Broccoli Cheese Patties.

plantainkebabs_featured4[whohit]PlantainKebabs[/whohit]

[yumprint-recipe id=’246′]